How to Build an LTL (Lease-to-Liquidity)
Think of it as the crypto equivalent of a cash-out refinance. You already own the asset — say, some BTC sitting idle — and instead of selling it outright and losing your position, you sell it into your LTL wallet, take a cash payout instantly, and follow a buy-back plan to reacquire it over time. The asset itself stays locked against a new LTO in the meantime, and comes back to you once you've settled in full.
Step 1 — Choose what to sell from your LTL wallet
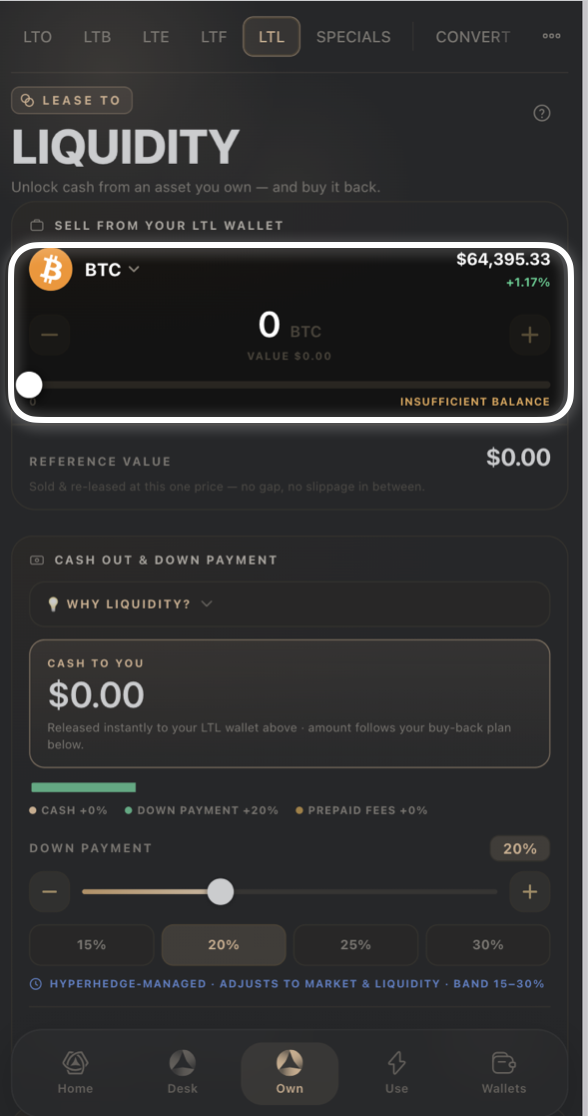
From the Own tab, select LTL.
Pick the asset (for example BTC) and set the amount using the slider. If your LTL wallet doesn't hold enough of that asset yet, you'll see an Insufficient balance notice.
Reference Value shows the fixed price your amount is valued at, with no slippage.
Step 2 — Cash out & down payment
Tap Why Liquidity? if you want the plain-language explanation of how the product works before continuing.
Cash to You shows what's released instantly to your LTL wallet — this follows your buy-back plan below.
Set your Down Payment using the slider or the 15% / 20% / 25% / 30% presets. This is HyperHedge-managed and adjusts to market and liquidity within a 15–30% band.
Step 3 — Set your buy-back plan
Origination — All-in, Upfront shows your combined down payment, platform, finance, and hedge costs, all due at signing.
Under Buyback Plan, you'll see a confirmation that your obligation is the finance principal only — every other charge is prepaid at signing.
Use the months slider or the 3 MO / 12 MO / 24 MO / 36 MO presets to set your buy-back term.
Step 4 — Review the contract details
Contract Details shows Cash Now, Bullet at Maturity, your Lease Cost Ratio (LCR), Prepaid at Signing, and Total Obligation (principal only) — with a reminder that your asset stays locked for the new LTO and returns to you on full settlement. Tap Full Breakdown for the line-by-line math: Reference value, minus Down payment, minus Platform fee, minus Finance charge, minus HyperHedge fee, equals Cash to you, plus Finance principal, plus Bullet due at maturity.
Step 5 — Review & sign
Tap Review & Sign LTL to confirm. Your position then appears under Your LTL Contracts, showing Active and Reacquired counts and your combined Cash figure — tap Liquidity Ledger for the full history.
Good to know:
LTL is the only Own product where the asset you're leasing against is one you already hold — everything else in Own finances a new position.
All fees are prepaid at signing on an LTL; your ongoing obligation is strictly the finance principal.
Need Help?
If you encounter issues during account creation, contact BitLease Support:
Email: support@bitlease.com
Subject: "LTL Liquidity Issue"
Include: A description of the problem, any error messages, and steps you've already tried.
Response Time: Within 24 hours.
For urgent security concerns, email: security@bitlease.com.
Related articles: How to Build an LTF (Lease-to-Forward) · Special Deals & Converting Between Wallets · A Tour of the Own Tab