How to Convert Assets
Asset conversion allows you to swap supported assets within your wallets. Use this feature to exchange stablecoins (USDT ↔ USDC), convert stablecoins to cryptocurrencies, or convert crypto assets from your LTO Wallet — without needing to withdraw to an external exchange.
Why Use Asset Conversion?
- Switch between USDT and USDC for payments or preferences.
- Acquire cryptocurrency for LTO contracts without external transfers.
- Rebalance your wallet composition.
- Convert assets held in your LTO Wallet directly, without an intermediate withdrawal step.
Supported Conversions
Stablecoins:
- USDT (Tether)
- USDC (USD Coin)
Cryptocurrencies:
- BTC (Bitcoin)
- ETH (Ethereum)
- BNB (Binance Coin)
- SOL (Solana)
- XRP (XRP)
- XAUT (Tether Gold)
- PAXG (PAX Gold)
Conversion directions:
- USDT ↔ USDC
- USDT or USDC → BTC, ETH, BNB, SOL, XRP, XAUT, PAXG
- BTC, ETH, BNB, SOL, XRP, XAUT, PAXG → USDT or USDC
Conversion Fee Structure
A 2% commission applies to all conversions, covering swap execution, liquidity provision, and market price acquisition.
How to Convert Assets
Step 1: Open the Convert Interface
From the Home Dashboard:
- Click the CONVERT button located next to ADD FUNDS, PLANS, and BUILDER.
From the Assets Page:
- Navigate to ASSETS in the main navigation.
- Click the CONVERT button on FUNDING Wallet or LTO Wallet pages.
The Convert modal will open.
Step 2: Select Your Source Wallet
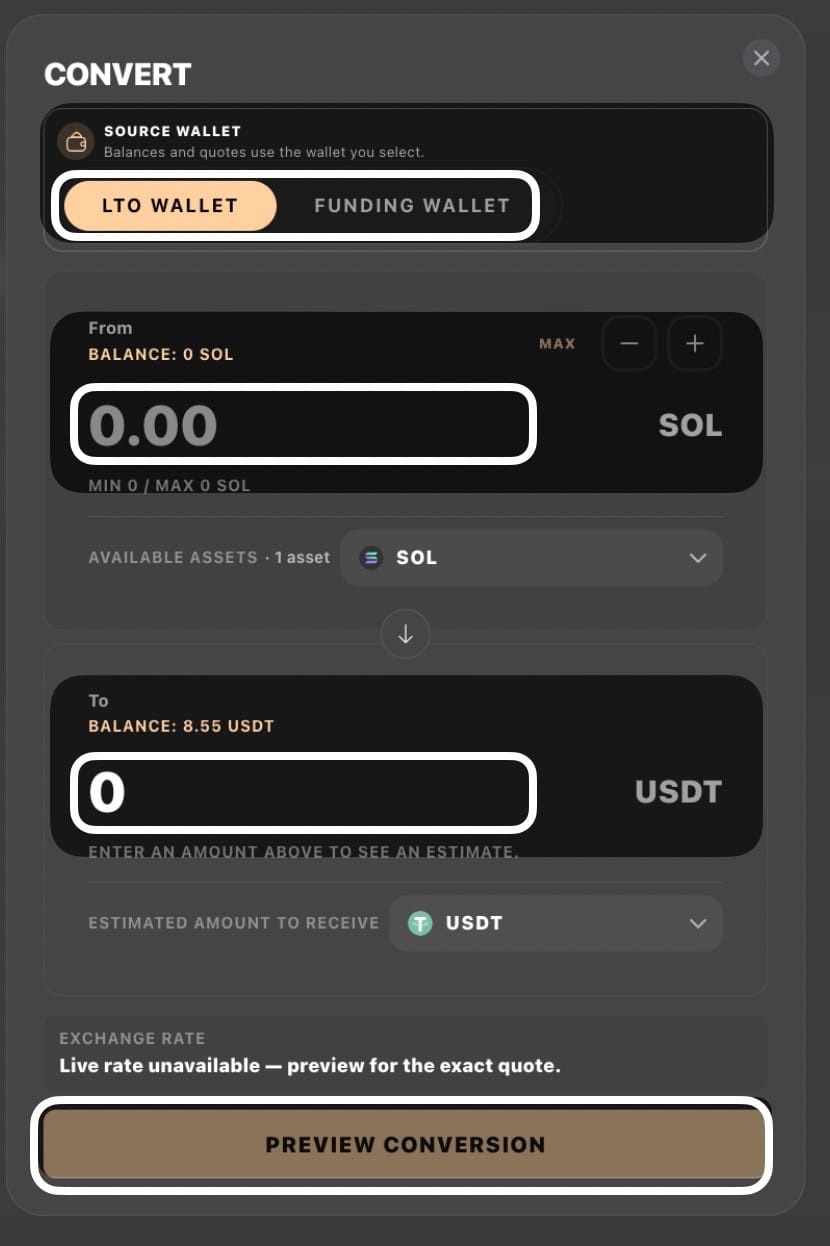
At the top of the modal, under SOURCE WALLET, you will see two options:
- LTO WALLET — converts assets held inside an active LTO contract position.
- FUNDING WALLET — converts assets held in your general funding balance.
Tap the wallet you want to convert from. Your balance for that wallet updates immediately in the From section below.
Important: The available assets shown in the dropdown will change depending on which wallet you select. Only assets with a non-zero balance in the selected wallet will appear.
Step 3: Select the Asset to Convert (From)
In the From section:
- Your current balance is displayed — for example, BALANCE: 0 SOL.
- Use the − and + buttons to adjust the amount, or tap MAX to convert your entire available balance.
- Click the asset dropdown (showing the current asset, e.g. SOL) to choose a different asset if more than one is available in the selected wallet.
- The MIN / MAX limits are shown below the input field and update based on your balance.
Step 4: Select the Asset to Receive (To)
In the To section:
- Your current balance of the destination asset is displayed — for example, BALANCE: 8.55 USDT.
- Click the ESTIMATED AMOUNT TO RECEIVE dropdown to select the destination asset (e.g. USDT, USDC).
- The estimated amount you will receive updates automatically once you enter the source amount.
If no source amount has been entered yet, the To field shows 0 and displays: "ENTER AN AMOUNT ABOVE TO SEE AN ESTIMATE."
Step 5: Review the Exchange Rate
The EXCHANGE RATE section at the bottom of the modal shows the live rate for your selected pair.
- If a live rate is available, it will be displayed here.
- If the rate is temporarily unavailable, you will see: "Live rate unavailable, preview for the exact quote."
In this case, proceed to the next step, the exact rate will be confirmed on the preview screen before you commit.
Step 6: Preview and Confirm
- Click PREVIEW CONVERSION to see the full breakdown: exact exchange rate, fee applied, source amount, and destination amount.
- Review all details carefully.
- Confirm the conversion to execute it immediately.
The conversion is processed instantly once confirmed. It cannot be reversed.
Balance and Eligibility Rules
- You must have a sufficient balance in the selected source wallet.
- Only free, unlocked balances are available for conversion.
- Assets locked inside an active LTO contract installment cycle cannot be converted.
- Minimum conversion amounts may apply and are shown in the interface at time of conversion.
Viewing Your Conversion History
All conversions appear in your transaction history:
- Navigate to the ASSETS page.
- Scroll to RECENT TRANSACTIONS.
Each conversion record shows: transaction type, currencies involved (FROM → TO), amounts sent and received, commission charged, timestamp, and status.
Click any transaction to view the full breakdown including exchange rate applied, fee calculation, final amounts, transaction ID, and execution timestamp.
Need Help?
If you encounter any issues during conversion, contact BitLease Support:
- Email: support@bitlease.com
- Subject line: "Convert Asset Issue"
- Include: A description of the problem, any error messages displayed, and the steps you already tried.
- Response time: Within 24 hours.
For urgent security concerns: security@bitlease.com