How to Complete Your Identity Verification (KYC)
What is KYC?
KYC stands for Know Your Customer. It is a standard identity verification process required by financial regulations in most countries. It protects users from fraud, prevents money laundering, and allows BitLease to operate as a regulated digital asset platform under ADGM and VARA guidelines.
On BitLease, completing KYC also unlocks higher account limits and eventually gives you access to VIP level benefits.
The four KYC levels on BitLease
BitLease uses a four-tier verification system:
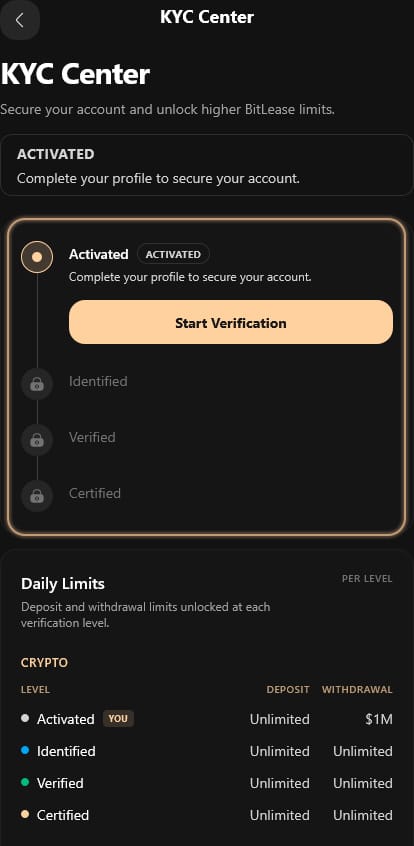
Activated — your starting level after sign-up. Crypto deposits are unlimited, but crypto withdrawals are capped at $1M per day. Fiat deposits and withdrawals are not available at this level.
Identified — you have provided your personal information (name, date of birth, nationality). Crypto and fiat limits increase significantly.
Verified — you have completed full document-based identity verification. Maximum limits are unlocked.
Certified — the highest level. Grants full access to all platform features and the highest transaction limits.
This article covers how to reach Identified status. The steps for Verified and Certified will be covered as those features become available.
How to open the KYC Center
There are two ways to reach the KYC Center:
- From the Home screen, tap the "ACTIVATED — Get Identified" banner near the top of the screen.
- From your Profile tab, tap the KYC Center card on the right side of the screen.
Both paths take you to the same KYC Center screen.
![[screenshot-kyc-center-main-screen-with-start-verification].jpg](https://storage.ghost.io/c/b9/26/b9263e02-568c-4f51-8827-380c534c9b5f/content/images/2026/08/1782884300591_b48f3afa4ef801ca.jpg)
Step 1 — Start Verification
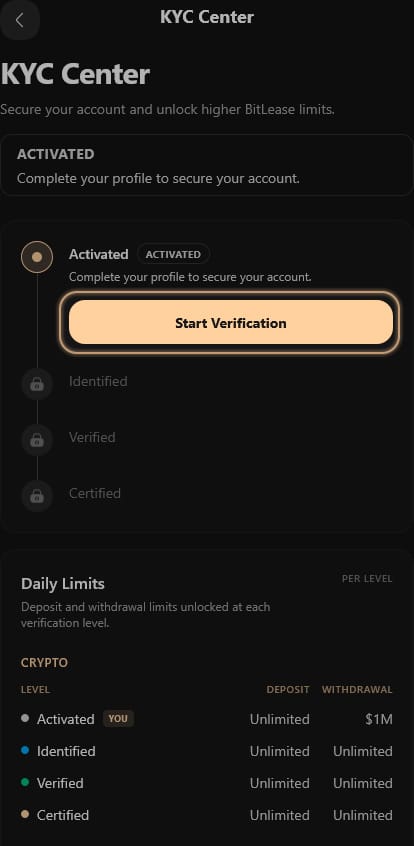
On the KYC Center screen, you will see your current status (Activated) and a timeline showing the four levels below it. The Identified, Verified, and Certified levels are locked and shown in grey.
Tap Start Verification to begin.
Step 2 — Enter your personal information
The next screen is titled Become Identified — Your Information.
You will see four fields to fill in:
- First name — enter your first name exactly as it appears on your official ID
- Last name — enter your last name exactly as it appears on your official ID
- Date of birth — use the format shown (mm/dd/yyyy)
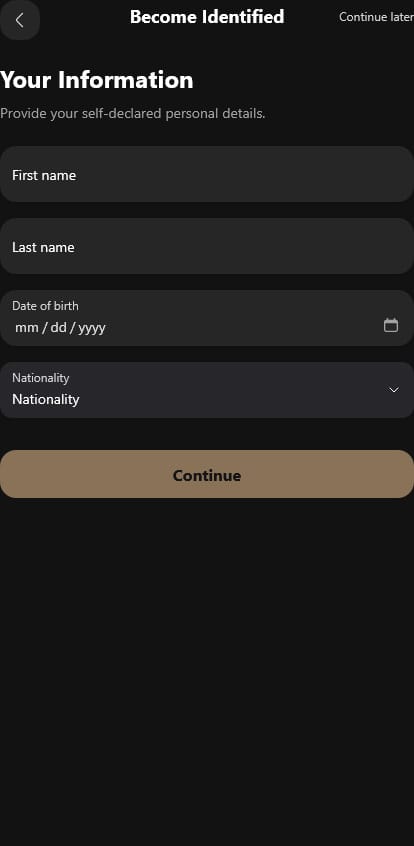
- Nationality — tap the dropdown and scroll to find your country. You can also scroll the list to locate it.
![[screenshot-become-identified-nationality-dropdown]](https://storage.ghost.io/c/b9/26/b9263e02-568c-4f51-8827-380c534c9b5f/content/images/2026/08/1782884395867_e4ebe94d420f1540.jpg)
All four fields are required. Once they are filled in, tap Continue.
Step 3 — Set your security questions
The next screen is titled Security Questions.
You will be asked to choose and answer three different security questions. These are used for account recovery if you ever lose access.
![[screenshot-security-questions-screen]](https://storage.ghost.io/c/b9/26/b9263e02-568c-4f51-8827-380c534c9b5f/content/images/2026/08/1782884460604_78f41fd877a9bf62.jpg)
For each question:
- Tap Select a question to open the dropdown and choose a question
- Type your answer in the Your answer field below it
You must complete all three questions before you can proceed. Choose questions with answers you will remember clearly. Answers are case-sensitive when used for account recovery.
Once all three are filled in, tap Submit for Review.
Step 4 — Save your recovery phrase
The next screen shows your Recovery Phrase — a sequence of 12 words.
![[screenshot-recovery-phrase-12-words]](https://storage.ghost.io/c/b9/26/b9263e02-568c-4f51-8827-380c534c9b5f/content/images/2026/08/1782884488131_501d76ff1ffe991a.jpg)
This is an important step. Read it carefully before continuing.
Your recovery phrase is the only way to recover your account if you lose access to your email and cannot answer your security questions. It cannot be retrieved from BitLease after this screen.
Write the 12 words down in order and store them somewhere physically secure — not on your phone, not in a photo, and not in an email to yourself. Anyone who has these words can access your account.
Once you have saved the phrase securely, check the box that reads I have saved my recovery phrase in a secure place, then tap Continue.
![[screenshot-recovery-phrase-checkbox-continue]](https://storage.ghost.io/c/b9/26/b9263e02-568c-4f51-8827-380c534c9b5f/content/images/2026/08/1782884506394_027f840dafb39e4b.jpg)
After submission
Your information is submitted for review. BitLease will process your submission and update your KYC status.
Once approved, your account status will change from Activated to Identified. You will see this reflected in your Profile tab under KYC Status and in the User Center under Identity Verification.
![[screenshot-user-center-identity-verification-identified]](https://storage.ghost.io/c/b9/26/b9263e02-568c-4f51-8827-380c534c9b5f/content/images/2026/08/1782884541735_8f8b6bb88de35659.jpg)
What comes next
Once you are Identified, you can start using the platform with expanded limits. Further verification steps (Verified and Certified) unlock additional capabilities as the platform introduces them.
For a full explanation of what each level unlocks in terms of daily limits and features, see Your KYC Levels Explained in the Account Settings section.
Need Help?
If you encounter issues, contact BitLease Support:
- Email: support@bitlease.com
- Subject: "Account Verification Issue"
- Include: A description of the problem, any error messages, and steps you’ve already tried.
- Response Time: Within 24 hours.
For urgent security concerns, email: security@bitlease.com.